Creating Routes Between Fields
Dynamic Routes Transform Scenes Instantly
Some fields can be routed to other fields. When two fields are routed, changing the value of one event automatically changes the values of the fields that it is routed to.
When you create routes between events, things begin to happen in your scene. You can connect a touch sensor to a lamp to turn on a light, for example. You can also create routes between objects so that when the position, material, or texture of the first object changes, the attributes of the connected object change as well. Routes are created in the Outline Editor.
A Few Terms
Fields are of two types: outputs send values, and inputs receive values. Many fields have both an output (called an outputOnly) and an input (called an inputOnly) associated with them. The Outline Editor uses a graphical shorthand to show these events:
Rules for Routing
The Outline Editor does not let you make »illegal« routes. Here’s a list of rules for routing events:
Inputs are always routed to outputs, and vice versa. You can’t route two inputs to each other, or two outputs to each other.
The field types of the events must be identical. An SFColor event can’t be routed to an MFColor event, for instance.
Creating a Route
Here’s an example of how to create a route:
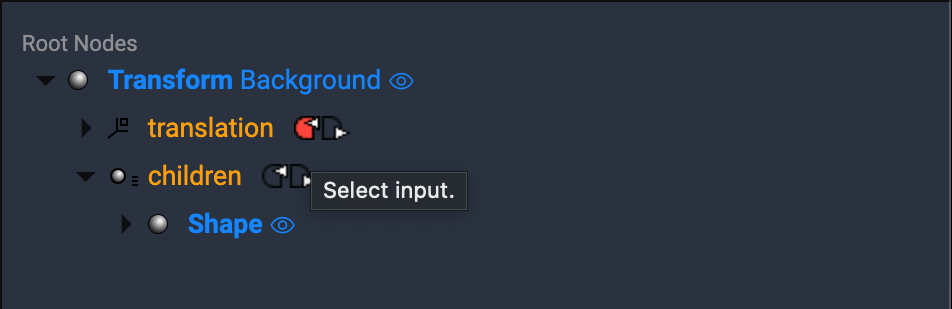
- Click an output connector (the right-pointing triangle). This step selects the output and marks it colored. You’ve now identified the starting point for this route. If you change your mind, you need to click on any field name in the Outline Editor before you can start a new route.
- Test out routes. Potential routes highlight colored when you move the cursor over the pointing triangle associated with the field. If you can’t route to a particular field, its triangle remains unlit when you move the cursor over it.
- When you’ve decided on a route, click the input (the left-pointing triangle). This step creates a route between the two fields. The event triangles turn black to indicate that they are routed, and the selection is cleared.
Tip: If you don’t want the selection cleared after the route is created, hold down the Shift key when you click the mouse in step 3. This action creates the route and leaves the original input/output selection so that you can create other routes to that same field.
Displaying Route Information
If you have a lot of routes in your file, displaying all of them at one time may feel a bit tangled. You can click the tail of a route (the small circle on the line attached to the event) to toggle the display of the colored route between fields.

To view detailed information about a route, Shift-click the expander arrow before the field type image.

Multiple Routes
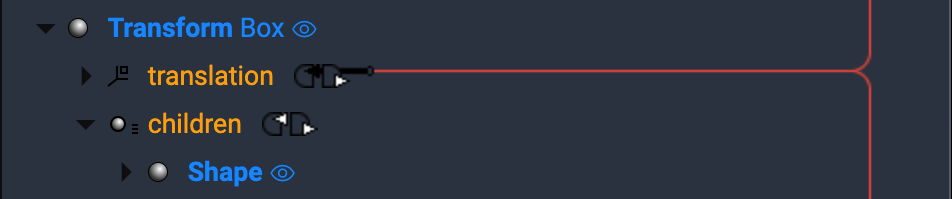
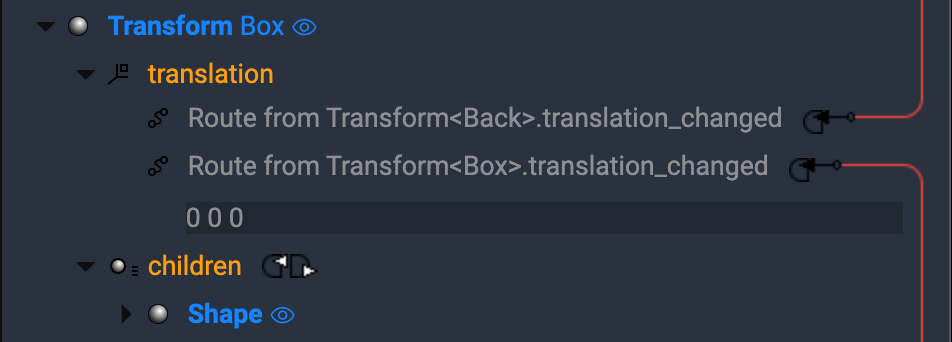
An output can be connected to multiple inputs (this is sometimes referred to as »fan out«). Similarly, an input can be connected to multiple outputs (this is referred to as »fan in«). In the Outline Editor, both fan in and fan out are represented as thick black lines for the tail of the route. Here’s an example of fan-in:
If you Shift-click the expander arrow before the field type image, the routes composing the fan are displayed individually so that you can choose which one to follow.
Removing a Route
To remove a route, hold down the Ctrl-or-Cmd key and click the input/output connector (containing a triangle).